How to Make DIY Plant Pots
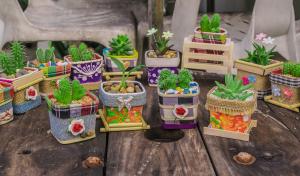
Plant pots are not only essential for keeping plants alive but also add a touch of class to any indoor or outdoor space. However, store-bought plant pots can be pricey and uninspiring. The good news is that you can make your plant pots at home with affordable materials and tools. Here are steps on how to make DIY plant pots:
Materials Needed
Before we begin, here are the materials you will need:
Terracotta clay
Water
A rolling pin
A clay cutter or a sharp knife
A round object such as a bowl or cookie cutter
A flat surface such as a cutting board or a table
A baking sheet
An oven
Steps
Now, let's begin by following these simple steps:
Step 1: Prepare the Clay
Start by preparing the clay. Take a chunk of clay and knead it gently with your hands to remove air pockets. Then, add a small amount of water to make the clay soft and pliable but not too wet.
Step 2: Roll Out the Clay
Using the rolling pin, roll out the clay on a flat surface until it's about 1/4 inch thick or your desired thickness. Ensure the clay is even and smooth to avoid cracks when baking.
Step 3: Cut Out the Shape
Use a clay cutter or a sharp knife to cut out the desired shape of your plant pot. You can use the round object to create a perfect circle or any other shape you prefer. Ensure that your plant pot has a base and sidewalls high enough to hold soil and the plant.
Step 4: Create Drainage Holes
Using the clay cutter, create a few small drainage holes at the bottom of the pot to allow excess water to drain out. This is essential to prevent overwatering and root rot.
Step 5: Air Dry the Pot
Leave the clay pot to air dry overnight or for a few days. If your clay is still too wet to hold the shape, insert some newspaper inside the pot to keep its shape and speed up the drying process.
Step 6: Bake the Pot
Once completely dry, preheat the oven to the temperature indicated on the clay packaging. Then, place the pot on a baking sheet and bake it in the oven for the recommended time. After baking, allow it to cool in the oven before removing it to avoid cracking.
Step 7: Decorate the Pot (Optional)
You can decorate your plant pot by painting it with acrylic paint, adding stickers, or using a marker pen. Allow the paint to dry before planting your favorite plants in the pot.
The Bottom Line
Making your plant pots is a fun and creative way to add a personal touch to your indoor or outdoor space. Terracotta pots are not only affordable and easy to make but also durable and timeless. Follow these simple steps, and you will have an endless supply of DIY plant pots for your plants. Happy crafting!

 how many times do yo...
 how many planted tre...
 how many pine trees ...
 how many pecan trees...
 how many plants comp...
 how many plants can ...
 how many plants and ...
 how many pepper plan...


